Top Camera Settings Checklist – What to set before you shoot
Learning cameras can be fun, entertaining, and challenging. With the new found ability to take remarkable pictures comes a hefty checklist of camera settings, lighting worries, and framing issues. While most DSLRs have a plethora of settings, there are a few that constant constant monitoring and changes as your shooting environments and subjects change.
Learning cameras can be fun, entertaining, and challenging. With the new found ability to take remarkable pictures comes a hefty checklist of camera settings, lighting worries, and framing issues. While most DSLRs have a plethora of settings, there are a few that constant constant monitoring and changes as your shooting environments and subjects change.
Shutter Speed
The shutter speed is one of the first items I think about before I snap a picture, and while I rarely keep a camera set to shutter priority, I must have a mental priority of the shutter speed needed to freeze motion. In most cases, I am fine with the fastest shutter speed my camera may obtain at a given exposure, but in my mind I need to have a minimum shutter speed (which I wish was a setting on my camera), that if I go below that number, I need to make a change. For portraits, it may be 1/60-120th of a second while for candid photographs I may strive for 1/250th of a second. I am always looking and paying attention to this number in almost every circumstance.
Aperture
There are a few less applications where not paying attention to your aperture may ruin your photos, but they exist nonetheless. Think about how much depth of field you need in any particular photograph to get all necessary objects in focus. If you are shooting single portraits, wide open apertures of >f/2.8 may be perfect for keeping those eyes in focus while a group photograph of several rows of people may require f/5.6-f/8 to keep everyone sharp.
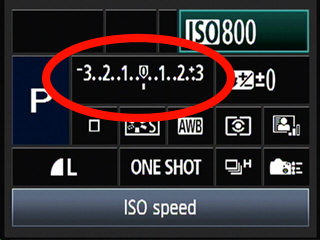
ISO
While accidentally having your ISO set to 800 while photographing outdoors in bright light (guilty) may not render your photos useless, you will lose detail and sharpness at higher ISO settings. I typically keep a base setting for each environment and fine tune those settings as needed. If I know I’m going outside for example, I will go ahead and set my camera to 200-400ISO, even before checking my exact lighting conditions. This should allow me to shoot perfectly in the sun or in the shade without having any issues. Even though I may end up eventually lowering it to 100ISO if my lighting is bright enough, at least if I forget my pictures will still be great.
Focusing Modes
This is a setting that is frequently overlooked unfortunately because there is no current method of correcting out of focus images. While you can reduce grain from high ISO or alter your exposure in post, missing focus will ruin every photograph. If your subject is reasonably still, single shot modes will suffice. Pick a focus point (chose the center if you do not already have a composition in mind) and lock focus on your subject. Feel free to recompose after locking focus as long as your subject is not moving towards or away from you. If your subject may move, focus using a servo focus mode and position your focus point to the position of the frame you would like your subject. You may need to change your aperture to give you extra depth of field. Chose your focus points carefully as you will not be able to recompose after locking focus though as the camera will continually adjust focus.
Support
Enjoy the site?
Help support this site as I continue to provide product reviews, tips & tutorials, as well as the hottest deals in tech by shopping at B&H, Amazon.com, Adorama, Best Buy, & Ebay
Check out My Gear & some Amazing Deals on Camera Gear
Thank you for your support.
Follow us for the latest information about products, reviews, and DEALS!


Price Checker
Latest Reviews
-
Sony a7RIII vs a7RII Hands On Review
Sony’s a7RII took the full frame mirrorless market by storm just a few years ago...
-
The Only Camera Lens You Will Ever Need? Tamron 18-400mm Review
With a mind boggling 18-400mm zoom lens, Tamron should have your attention! But...
-
Nikon D7500 Hands On Review
When the Nikon D7500 was first announced, I had a bit of mixed feelings. There...
-
5 Camera Hacks For Creative Photos & Videos
These are 5 hacks I use all the time for more creative photos and videos....
-
Panasonic GH5 Review
The spec list on the Panasonic GH5 is absolutely ridiculous with 4k @ 60P, 1080p @...
-
Sony 16-35 F2.8 Gmaster and 12-24 F4 Lenses Hands On
Sony has just completed the Holy Trinity of lenses by releasing a new Sony...


Top Articles
-
Tamron 24-70 f/2.8 VC vs Canon 24-70 f/4L IS Review
The one stop increase in light for $200 less will make many photographers and videographers drool, however,...
-
Sony A7s Dual Video Mode - What is it and how does it work
One of Sony's new features in the A7s is the Dual Video Mode which allows separate recording of multiple...
-
Nikon D7100 Hands On Review
A 24mp camera with professional level weather sealing, 100% viewfinder coverage, 2 card slots, 6 fps...
-
Sigma 18-35mm F1.8 HSM Lens Review
I still can’t quite believe that the Sigma 18-35mm f1.8 lens exists but it does, and it is great! With...
-
Canon 70D Review and Test
We take the Canon 70D and put it through its paces checking out the build quality, ergonomics, dynamic...
-
The Real Cost to Upgrade - AT&T Next vs T-Mobile Jump Vs Verizon Edge Vs Sprint One Up
Recently, manufactures have been offering options to allow frequent upgrades of mobile devices at least once per...
-
Canon EOS M VS 5D Mark III - Can a $400 camera stand up to the $4000 champ?
Can a $400 camera take as good a picture as a $4000 pro shooter? Do you really need to be investing in...
- Favorites
-
Canon 6D Review
With Canon discontinuing the 5D mark II, it is clear that the Canon 6D is here to fill the cheaper full...
-
Sony A7 Review - A killer camera with a small footprint
The Sony A7 brings an awesome full frame sensor to the mirrorless market with a more reasonable price...
-
Backup & Security – How to backup your photos/videos
This is an issue I cannot stress enough. You must be diligent about backing up your photos, videos, and...
-
Nikon D7100 VS Canon 7D Part 1 - Photography DSLR Fight
We put the Nikon D7100 head to head with the Canon 7D to see how each camera performs. Head past the break...
-
Nikon D5300 Review
The Nikon D5300 rocks a 24MP sensor, no AA filter, Wifi, GPS, 5fps shooting, and more. But how do those...
-
Canon 24-70 f/4 IS Review - Updated w/Video
The Canon 24-70 f/4 IS is here and sharper than ever. Also part of this new upgrade was a hefty price...
-
Nikon D600 Review
An unbelievable DSLR at an unbelievable price widely available almost immediately after an announcement? This surely...